Wednesday, December 29, 2010

December’s Top 10 Favorite AEC 3D Printed Models

Guest blog by Julie Reece, Z Corp. Director of Marketing Communications.
Throughout the day I am fortunate enough to see a wide variety of ZPrinted models for a number of applications.  I am especially fond of AEC models because of the forms, intricate details and texture maps.  I decided to compile my top 10 favorite AEC ZPrinted models for December. See what you think...
1. St. Basil’s Cathedral (this is my favorite because of the vibrant color and textures that were 3D printed right out of a ZPrinter; this model is sitting on my desk.):

2. Boston Society of Architecture Building, courtesy of Munson3d.com (the textures on the façade and roof are incredible, and if you look closely at the first floor windows, you can see the full color, 3D printed images of the window displays– amazing!):

3. MIT Building (the bright white color of this model, combined with the textures, fine wall thicknesses and large size of the model itself, make this one of my favorites):

4. Bentley MicroStation plant model courtesy of Shinryo International and Team-S (the intricate web of pipes was 3D printed as one model in a single build):

5. Manhattan Cityscape (this is just downright impressive):

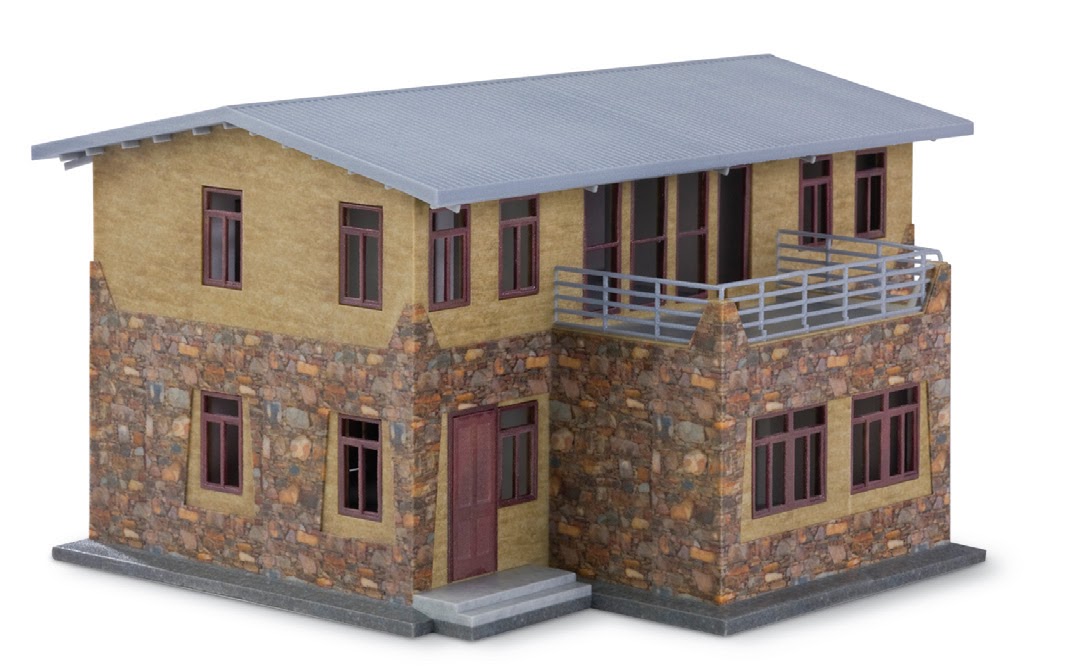
6. Detailed design study of a building (just look at the thin railings and the textures, which were 3D printed – not painted!):

7. Cutaway of a historic theatre (chosen for the incredible ZPrinted detail; check out the staircases on the inside of the model):

8. Courtesy of The Realization Group (this model is one of my favorites because of its large size, intricate detail, thin walls, and 3D printed roof shingles):

9. Courtesy of The Realization Group (this one gets points because it’s lit from the inside to demonstrate what the complex will look like at night when lights are on):

10. Courtesy of Ralf Lindemann (this model is impressive because the simplicity of white on black and its organic design):


Ok, 11. I couldn’t resist! (the curved lines of this ZPrinted model give the impression that it’s swaying in the breeze):


Which of these 3D printed models is your favorite? Do you have photos of ZPrinted AEC models that you’d like to see in our list of January favorites? Send them to jreece@zcorp.com.
http://www.zcorp.com  

Wednesday, December 22, 2010

ZPrint Helps Vision Impaired Couple Visualize New Home

How many of you watch the ABC television series Extreme Home Makeover?

An architectural scale model built by Z Corp. customer Moody Nolan of Columbus, Ohio, and supported by Z Corp. channel partner 3DP Technology, appeared on the December 5th edition of the popular TV show. A visually impaired couple devoted to helping the local community received a home makeover, complete with technologies that help people with disabilities. Since the couple could not see their new home, a ZPrinted model was provided to them so they could feel their home in order to get a sense of what it looked like.


The full episode can be seen in the following link: http://abc.go.com/watch/extreme-makeover-home-edition/SH559052/VD55100979/the-anderson-family. Watch for the scene after they move the bus to expose the family’s new home.

A video showing how the model was made appears in the following link: http://www.youtube.com/watch?v=Az-kXbLd0mg.

Note that Moody Nolan uses a ZPrinter 650 for maximum build size, and with zp150 composite material, they are able to infiltrate their ZPrints with salt water spray. Like many architects, Moody Nolan wants to produce the whitest models at the lowest costs in the fastest time. The ZPrinter 650 with zp150 enables them to do so.

For more info on the zp150 composite material, visit http://www.zcorp.com/en/Products/3D-Printers/Material-Options/spage.aspx.

http://www.zcorp.com

Wednesday, December 15, 2010

Autodesk University 2010 – Part II

Last week, I blogged about AU 2010 and wrote about the Product Clinic virtual class and the Autodesk technology presentations. This week, let’s talk about the Exhibit Hall.

On the Z Corp. stand, we showed our ZPrinter 450, ZScanner 700, and ZBuilder Ultra solutions with several part models from the printer and rapid prototyping systems. As usual, visitors to the booth were impressed with the detail and color quality of the ZPrints. This year, several Autodesk users from the manufacturing and product design space were equally intrigued by the resolution and smoothness of the ZBuilder Ultra plastic prototype parts.

In the Autodesk exhibit space, the Tesla Motors full-size electric car took center stage, but there were a couple of interesting 3D printed scale models on display as well. Let’s start with the Austrian pavilion at the Shanghai World Expo. This futuristic building was designed by SPAN Architects and scale models (approximately 24 inches x 20 inches) were completed with traditional subtractive metal manufacturing, plastic, and plaster-based (Z Corp.) systems. It was interesting to see the differences and the pros/cons for each model. The metal model was painted in a shiny gloss white and quite smooth, but likely cost a bundle to manufacture.


The plastic model (by another manufacturer) was printed as one piece in orange plastic and contour stair-stepping is quite visible, leading me to question, "Why didn't somebody sand this model?"

The Z Corp. model was printed in four separate pieces on a ZPrinter 650 to get the desired scale with the added benefit of being able to see inside the structure.

The Autodesk Exhibit Manager, Matt Tierney, was quite pleased with the overall quality and smooth look and feel of the model.

A few feet away from the World Expo display, there was an exhibigt featuring the work of Autodesk CEO, Carl Bass, a noted furniture-making enthusiast.


Using the ZPrinter 450 in the Autodesk San Francisco Customer Briefing Center, Bass had several 3D prints created with different surface finishes and textures.  One was speckled granite adnd others were wood grain.  Ultimately, Bass chose black granite for his home garden piece.


http://www.zcorp.com

Wednesday, December 8, 2010

Autodesk University 2010 – part I

Autodesk University (AU) took place last week in Las Vegas. Attendance (7000+) was up this year after a two-year decline, and the energy level was palpable. I felt it in the exhibit hall and in between the classroom sessions. While at AU, I delivered a Product Clinic in the form of a virtual class; the clinic was entitled “The Emergence of 3D Printing in AEC” and the content was based on the AIA Continuing Education course of a similar title. Attendees were able to see/hear the webcast and then ask questions in a live chat window. The AU folks plan to post these virtual classes for those who could not attend during the clinic time slots.

Aside from my “virtual speaking” class, here are some AU2010 observations - part I (part II next week):

In the opening general session, Autodesk CEO Carl Bass introduced six presenters from multiple industries (building, infrastructure, manufacturing, and entertainment) who described their recent projects around the theme of “making an impact.” The talks included interesting projects from Tesla Motors (Autodesk Alias styled electric car driven on stage), Project H Design (Autodesk AEC software presumably used), Bespoke Innovations (custom-designed and 3D-printed prosthetic devices), and the digital studio that made the new TRON movie (Autodesk Media & Entertainment software). Autodesk CTO Jeff Kowalski talked about the cloud or “infinite computing” and how it will change the way people design and simulate. The entire General Session is available here - http://au.autodesk.com/?nd=keynote

The building industry keynote was all about the use of BIM “assets” for downstream applications such as MEP system design, structural design/analysis, building performance analysis, construction scheduling, and efficient facility maintenance and operation. There was also a quick look at Project Vasari. Here is the description from Autodesk Labs web page …

Autodesk® Project Vasari is an easy-to-use, expressive design tool for creating building concepts. Vasari goes further, with integrated analysis for energy and carbon, providing design insight where the most important design decisions are made. And, when it’s time to move the design to production, simply bring your Vasari design data into the Autodesk® Revit® platform for BIM, ensuring clear execution of design intent.

Project Vasari is focused on conceptual building design using both geometric and parametric modeling. It supports performance-based design via integrated energy modeling and analysis features. This new technology preview is now available as a free download and trial on Autodesk Labs.

It will be interesting to see if this software can stop the Google SketchUp and Rhino momentum in the AEC market, and how Autodesk will choose to package and market this new conceptual design tool. So far, 80,000 downloads have been reported. You may recall an earlier guest blog in this space by Microsol’s Dolly Haardt showing how a conceptual massing model in Revit can be exported for 3D printing. As far as I understand, these are the design tools which are in Project Vasari.

More on AU2010 next week!

http://www.zcorp.com

Wednesday, December 1, 2010

Six Steps to Assess the True Cost of a 3D Printing System

Guest post by Mark Cook, Z Corp.'s VP of Research and Development.

There’s been a lot of hype over the past year about low-cost 3D printers. All of the rapid prototyping (additive manufacturing) companies have either introduced low-priced systems to the market or lowered the price of existing systems and promote how they are making the technology more accessible to designers, engineers and even the hobbyist. Editors, industry analysts and even the New York Times have jumped on this trend which seems to be the focus of nearly every article and report.

But what is a low-cost 3D printer? When people talk about low cost, they seem to refer only to the purchase price of the 3D printer. Sometimes machines that are billed as low cost are actually much more expensive than most other machines when all variable costs are factored into the equation. We’ve had customers tell us that they purchased another system because of the low initial purchase price of the printer itself, only to quickly discover that they couldn’t afford to keep the system operating. It became an expensive paper weight.

So, how can you cut through the hype and determine the real cost of a 3D printer? Here are six easy steps.

First, let me provide a disclaimer that I’m only referencing industrial- or professional-quality 3D printers. Industry experts seem to universally agree that open source systems that have been receiving quite a bit of publicity recently are not suitable for professional use from a quality, accuracy, throughput or speed standpoint.

1. Yes, affordability starts with a low-priced machine. But look beyond the price of the machine itself. Check to see if the system requires expensive lasers, complex thermal controls or special facility requirements. All of these items can add thousands of dollars onto the price of a machine.

2. How expensive is the build material? Find out how much build material is included in the purchase price of the system. Be sure to base this cost on volume rather than weight (i.e.; how many prototypes will that amount produce?). Then learn the on-going replacement cost of the material.

3. What about waste? Is all of the unused build material from a build completely recycled for future builds and therefore unwasted? If not, make sure you factor the cost of the wasted material into your cost calculator. And, does the system require you to build supports? Some systems require you to build supports, others don’t. Building supports requires expensive build material that can really add up over time, so be sure you factor this ongoing cost into your estimate.

4. What about the cost of post-processing? All prototyping systems require some sort of post-processing. Check to see if you must purchase additional equipment, chemicals, ventilation and special hazardous waste handling and disposal in order to post-process parts. Compare those systems with systems that provide you with the low-cost option to cure parts with tap water and Epsom salt.

5. Assess maintenance costs. Some systems use standard, off-the-shelf inkjet printing technology and a modular design in order to make component replacement quick, easy and cost efficient.

6. Considering all of these variable costs, estimate the total expense per finished model.

Example:
Total cost for Z Corp.'s finished ZPrinted models runs about $2 - $3 USD per cubic in ($0.12-$0.18 USD per cubic cm).  A 4.0 cubic in (66 cubic cm) model like the one below costs less than $20 USD to produce.


If low-cost 3D printing is important to you, “Buyer beware.”

http://www.zcorp.com